Media Summary: This is the first recording in Exercise of a This is the second recording in Exercise of a After loading the CAM-Part (Step 1), this video is Step 2 in Exercise of the Interactive Training Course for

Inventorcam Imachining Getting Started Adding - Detailed Analysis & Overview

This is the first recording in Exercise of a This is the second recording in Exercise of a After loading the CAM-Part (Step 1), this video is Step 2 in Exercise of the Interactive Training Course for This is the fifth recording in Exercise of a This is the third recording in Exercise of a This video is Step 1 in Exercise of the Interactive Training Course for

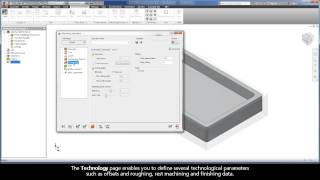
After launching the Autodesk Inventor model (Step 1), this video is Step 2 in Exercise of the Interactive Training Course for ... We use Autodesk® Inventor® CAM to explore a variety of 4-axis machining operations. In addition to rotary machining techniques, ...

Photo Gallery

InventorCAM iMachining Getting Started: Adding a new Machine and Material to the iDatabase
InventorCAM iMachining Getting Started: Defining the CAM-Part and adding an iMachining operation
InventorCAM iMachining Getting Started - Walkthrough: Create and define the CAM-Part
InventorCAM iMachining Getting Started - 2D Geometries: Open pockets
InventorCAM iMachining Training Course - Exer #2: Add an iMachining 2D operation...
InventorCAM iMachining Getting Started: The Tool definition and its effects on iMachining
InventorCAM iMachining Getting Started - Walkthrough: Verify the tool path and generate GCode
InventorCAM iMachining Getting Started - 2D Example: Outside shape machining
InventorCAM iMachining Getting Started: Using the iMachining Technology Wizard
InventorCAM iMachining Tutorial Series - Video 1
InventorCAM iMachining Training Course - Exer #4: Load the CAM-Part
InventorCAM iMachining Training Course - Exer #1: Start InventorCAM...
Sponsored
Sponsored
View Detailed Profile
InventorCAM iMachining Getting Started: Adding a new Machine and Material to the iDatabase

InventorCAM iMachining Getting Started: Adding a new Machine and Material to the iDatabase

This is the first recording in Exercise #2 of a

InventorCAM iMachining Getting Started: Defining the CAM-Part and adding an iMachining operation

InventorCAM iMachining Getting Started: Defining the CAM-Part and adding an iMachining operation

This is the second recording in Exercise #2 of a

Sponsored
InventorCAM iMachining Getting Started - Walkthrough: Create and define the CAM-Part

InventorCAM iMachining Getting Started - Walkthrough: Create and define the CAM-Part

This is the first recording in Exercise #1 of a

InventorCAM iMachining Getting Started - 2D Geometries: Open pockets

InventorCAM iMachining Getting Started - 2D Geometries: Open pockets

This recording is Part 2 in an

InventorCAM iMachining Training Course - Exer #2: Add an iMachining 2D operation...

InventorCAM iMachining Training Course - Exer #2: Add an iMachining 2D operation...

After loading the CAM-Part (Step 1), this video is Step 2 in Exercise #2 of the Interactive Training Course for

Sponsored
InventorCAM iMachining Getting Started: The Tool definition and its effects on iMachining

InventorCAM iMachining Getting Started: The Tool definition and its effects on iMachining

This is the fifth recording in Exercise #2 of a

InventorCAM iMachining Getting Started - Walkthrough: Verify the tool path and generate GCode

InventorCAM iMachining Getting Started - Walkthrough: Verify the tool path and generate GCode

This is the fifth recording in Exercise #1 of a

InventorCAM iMachining Getting Started - 2D Example: Outside shape machining

InventorCAM iMachining Getting Started - 2D Example: Outside shape machining

This is the first recording in a

InventorCAM iMachining Getting Started: Using the iMachining Technology Wizard

InventorCAM iMachining Getting Started: Using the iMachining Technology Wizard

This is the third recording in Exercise #2 of a

InventorCAM iMachining Tutorial Series - Video 1

InventorCAM iMachining Tutorial Series - Video 1

This is Video 1 of the

InventorCAM iMachining Training Course - Exer #4: Load the CAM-Part

InventorCAM iMachining Training Course - Exer #4: Load the CAM-Part

This video is Step 1 in Exercise #4 of the Interactive Training Course for

InventorCAM iMachining Training Course - Exer #1: Start InventorCAM...

InventorCAM iMachining Training Course - Exer #1: Start InventorCAM...

After launching the Autodesk Inventor model (Step 1), this video is Step 2 in Exercise #1 of the Interactive Training Course for ...

InventorCAM Basics -  Part 1: Programming

InventorCAM Basics - Part 1: Programming

... programming um after that we'll

InventorCAM iMachining Training Course - Exer #5: Load the CAM-Part

InventorCAM iMachining Training Course - Exer #5: Load the CAM-Part

This video is Step 1 in Exercise #5 of the Interactive Training Course for

Autodesk Inventor CAM:  A Close Look at 4-Axis Machining

Autodesk Inventor CAM: A Close Look at 4-Axis Machining

We use Autodesk® Inventor® CAM to explore a variety of 4-axis machining operations. In addition to rotary machining techniques, ...

Related Video Content

WhatsApp被封号?如何申请解封? - 知乎 information

3种解封WhatsApp账号的方法 如果你的WhatsApp帐号被封锁,你将无法继续使用WhatsApp的聊天功能,并且每次打开应用程序时都会看到“此帐号遭禁止使用WhatsApp”的消息。 如果你认为自己没有违 …

Whatsapp安卓版怎么下载? - 知乎 information

提供有关如何下载WhatsApp安卓版的详细指南,帮助用户轻松获取并安装该应用。

如何在国内手机安装whatsapp? - 知乎 information

鸿飞 WhatsApp在国内的安装并非易事,但有了这份2025详细版教程,无论是iPhone还是安卓用户都能轻松搞定,甚至还能学会如何避免新号被封的风险。 WhatsApp 国内手机安装教程(2025 详细版) 一 …

whatsapp 被限制了 怎么办呢?还能找回吗? information

WhatsApp 一次性联系支持的人不超过 50 个。 当超过 51 人的时候,就会出现 WhatsApp 用不了的情况,一般 4 小时后,便能正常使用 WhatsApp,若 4 小时还 是不能正常使用,那么封号的可能性就比 …

WhatsApp号码被封号,禁止使用怎么办? - 知乎 information

最后,再说一下WhatsApp使用的注意事项,对于新注册的用户我的建议是要先养号,不要急于去加客户、发推广消息。 前期可以每天少量的加客户,多和客户聊天,养个1-3个月的时间数量可以慢慢增加 …